
Preprocessed Glacier Directories#
The simplest way to run OGGM is to use Glacier directories prepared by the OGGM developers. Depending on your use case, you can start from different stages of the processing chain, map sizes, and model setups.
These directories were generated using the standard parameters of the corresponding OGGM version (and a few alternative configurations). If you need to modify some parameters, you may have to start from an earlier processing level and re-run parts of the workflow. Whether this is necessary depends on where you want your workflow to diverge from the default settings (this will become clearer in the examples below).
To initialize pre-processed directories, use
workflow.init_glacier_directories() with the
prepro_base_url, from_prepro_level and prepro_border arguments.
This will download the requested directories. Additional options are
described below.
If you prefer to get started immediately, see the 10 minutes to… a preprocessed directory tutorial.
Processing levels#
There are six available levels of pre-processing:
Level 0: the lowest level, with directories containing the glacier outlines only.
Level 1: directories now contain the glacier topography data as well.
Level 2: at this stage, the glacier flowlines and their downstream lines are computed and ready to be used.
Level 3: has the baseline climate timeseries (e.g. W5E5 or ERA5) added to the directories. It also contains all necessary pre-processing tasks for a dynamical run, including the mass balance calibration, bed inversion, up to the
tasks.init_present_time_glacier()task. These directories still contain all data that were necessary for the processing. Therefore they are large in size but also the most flexible since the processing chain can be re-run from them.Level 4: includes a historical simulation from the RGI date to the last possible date of the baseline climate file (currently January 1st 2020 at 00H for W5E5, and January 1st 2026 at 00H for ERA5), stored with the file suffix
_historical. Moreover, most configurations (those that includespinupin their url) may include a simulation running a spinup from 1979 to the last possible date of the baseline climate file, stored with the file suffix_spinup_historical. This spinup attempts to conduct a dynamic temperature sensitivity (“melt factor”) calibration and a dynamic spinup matching the RGI area. If this fails, only a dynamic spinup is carried out. If this also fails, a fixed geometry spinup is conducted. To learn more about these different spinup types, check out Dynamic spinup.Level 5: is same as level 4 but with all intermediate output files removed. The strong advantage of level 5 directories is that their size is considerably reduced, at the cost that certain operations (like plotting on maps or re-running the bed inversion algorithm) are not possible anymore.
In practice, most users are going to use level 2, level 4 or level 5 files. To save space on our servers, level 3 data might be unavailable for some experiments (but are easily recovered if needed). For each level, there are also summary files (e.g. in this OGGM cluster folder) which can be used for regional analyses of the glacier statistics, climate statistics, fixed geometry mass-balance (without dynamical area changes), and historical run outputs with and without spinup.
Changes to the version 1.4 directories (pre 2023)
In previous versions, level 4 files were the “reduced” directories with intermediate files removed. Level 5 was very similar, but without the dynamic spinup files. In practice, most users won’t really see a change.
Here are some example use cases for glacier directories, and recommendations on which level to pick:
Running OGGM from climate model (GCM / RCM /ESM) data with the default settings: start from level 5
Using OGGM’s flowlines but running your own baseline climate, mass balance or ice thickness inversion models: start at level 2. When using an own module, for instance for the mass balance, one can still decide to use OGGM again further on in the workflow, for instance for the glacier dynamics. This is the workflow used by associated model PyGEM for example.
Run sensitivity experiments for the ice thickness inversion: start at level 3 (with climate data available) and re-run the inversion steps.
Glacier map size: the prepro_border argument#
The size of the local glacier map is given in number of grid points outside the glacier boundaries. The larger the domain, the larger the glacier can become. Here is an example with Hintereisferner in the Alps:
base_url = 'https://cluster.klima.uni-bremen.de/~oggm/gdirs/oggm_v1.6'
base_url += '/L1-L2_files/elev_bands'
f, axs = plt.subplots(2, 2, figsize=(8, 6))
for ax, border in zip(np.array(axs).flatten(), [10, 80, 160, 240]):
    gdir = workflow.init_glacier_directories('RGI60-11.00897',
                                             from_prepro_level=1,
                                             prepro_base_url=base_url,
                                             prepro_border=border)
    graphics.plot_domain(gdir, ax=ax, title='Border: {}'.format(border),
                         add_colorbar=False,
                         lonlat_contours_kwargs={'add_tick_labels':False})
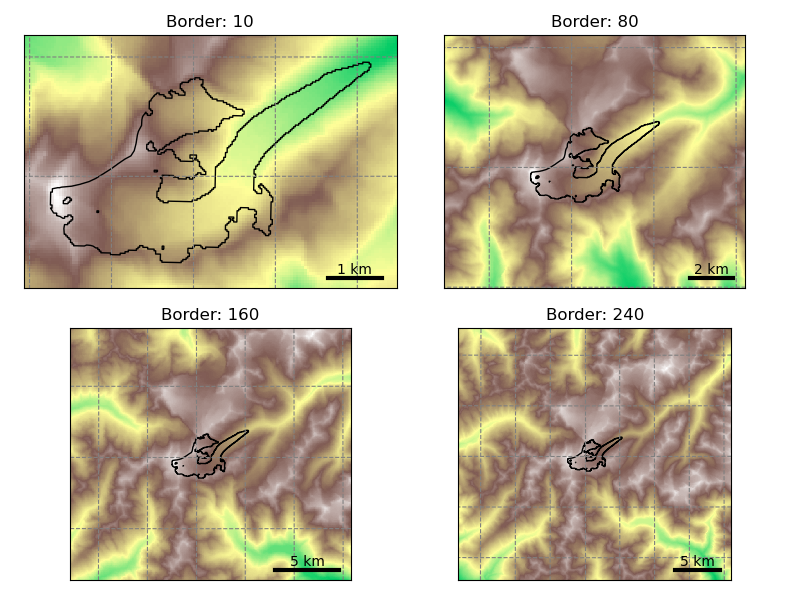
Users should choose the border parameter depending on the expected glacier growth in their simulations. For simulations into the 21 st century, a border value of 80 is often sufficient. However, for the OGGM global glacier projections until 2100 or 2300, and most level 5 preprocessed glacier directories we use a border value of 160. For runs including the Little Ice Age, a border value of 160 or even 240 is recommended. Newer OGGM preprocessed glacier directories (since OGGM v1.6.3) do not have border 240 available, but you could ask us to create it if you need it.
Users should be aware that the amount of data to download isn’t small, especially for full directories at processing level 3 and 4. It is recommended to always pick the smallest border value suitable for your research question, and to start your runs from level 5 if possible. Here is an indicative table for the total amount of data for the default configuration (elev_bands/W5E5/per_glacier_spinup/RGI62) as of 1.6.3 for all 19 RGI regions:
Level |
B 10 |
B 80 |
B 160 |
|---|---|---|---|
L0 |
909M |
909M |
909M |
L1 |
3.8G |
22G |
66G |
L2 |
9.7G |
63G |
188G |
L3 |
69G |
195G |
|
L4 |
96G |
224G |
|
L5 |
34G |
36G |
L4 and L5 data are not available for border 10 (the domain is too small for the downstream lines).
Certain regions are much smaller than others of course. As an indication, with prepro level 3 and a map border of 160, the Alps are ~3.4G large, Greenland ~19G, and Iceland ~596M.
Note
The data download of the preprocessed directories will occur one single time
only: after the first download, the data will be cached in OGGM’s
dl_cache_dir folder (see First step: system settings for input data).
Available pre-processed configurations#
OGGM has several configurations and directories to choose from, and the list is getting larger regularly. Don’t hesitate to ask us if you are unsure about which to use, or if you’d like to have more configurations to choose from!
To choose from a specific preprocessed configuration, use the prepro_base_url
argument in your call to workflow.init_glacier_directories(),
and set it to the url of your choice.
The recommended prepro_base_url for a standard OGGM run is:
In [1]: from oggm import DEFAULT_BASE_URL

In [2]: DEFAULT_BASE_URL
Out[2]: 'https://cluster.klima.uni-bremen.de/~oggm/gdirs/oggm_v1.6/L3-L5_files/2025.6/elev_bands/W5E5/per_glacier_spinup/'
This is the URL that was used to generate the OGGM 1.6.3 standard projections (OGGM global glacier projections) with the following basic set-up:
all default OGGM parameters
GSWP3-W5E5 reference climate
“informed three-step” mass balance model calibration (see Calibration)
Dynamic spinup with dynamic melt factor calibration and spinup to match the area at the RGI date
Recommended level 3-5 configurations#
Our tutorials provide examples of applications based on some of the preprocessed glacier directories. Below we describe the most commonly used oggm_v1.6/L3-L5_files glacier directories.
We analysed the glacier directory and test projection differences in this OGGM blogpost.
OGGM v1.6.1 standard directories (2023.3/elev_bands/W5E5_spinup/RGI62/..)
OGGM standard directories using OGGM v1.6.1 (released in 2023), with W5E5 as baseline climate, RGI62 as glacier inventory, and dynamical spinup and calibration performed individually for each glacier.
OGGM v1.6.3 standard directories (2025.6/elev_bands/W5E5/per_glacier_spinup/RGI62/..)
Updated standard projections using OGGM v1.6.3 and the 2025.6 preprocessed glacier directories (the differences between versions are described in New preprocessed directories).
OGGM v1.6.3 standard directories with ALL shop datasets (2025.6/elev_bands_w_data/W5E5/per_glacier_spinup/RGI62/..)
Same as above, but with all shop datasets added to the directories per default. See OGGM Shop datasets for a full list.
OGGM v1.6.3 standard directories with avalanches (global_snowslide_maps_oggm_2025.6/global_whypso/..)
Identical to the OGGM v1.6.3 standard projections, but with avalanche maps (snowslide_1m) added to gridded_data and to 1D elevation band data. Check out the OGGM/Snowslide for more information.
ERA5-based calibration (2025.6/../ERA5/per_glacier_spinup/RGI62/..)
Identical to the OGGM v1.6.3 standard projections, but using ERA5 instead of GSWP3-W5E5 as baseline climate for the calibration. ERA5 has a higher spatial resolution (0.25° × 0.25°) than W5E5 (0.5°).
For the precipitation factor initial guess, we use a linear fit to the winter precipitation instead of a logarithmic fit that was used for W5E5. Details are in this MB calibration tutorial and this jupyter notebook that estimated the fit using in-situ winter mass-balance data.
Regional calibration (RGI62) (2025.6/elev_bands/W5E5/regional_spinup/RGI62/..)
Each glacier is calibrated to match the regionally averaged specific mass balance (regional_spinup) instead of the individual glacier-specific estimates (similar to Zekollari et al., 2024). The purpose of this experiment is to provide a baseline for experiments.
Regional calibration with RGI 7.0G (2025.6/../W5E5/regional_spinup/RGI70G/..)
Same as above, but using the RGI70G glacier inventory instead of RGI62. Differences between RGI versions are described in the RGI documentation. The calibration strategy developed for RGI7 is described below.
Regional calibration with RGI 7.0C (glacier complexes) (2025.6/../W5E5/regional_spinup/RGI70C/..)
Same as above, but uses the glacier complex product (RGI70C; more details here), resulting in fewer modeled glacier entities compared to individual glaciers (but the same area).
New 2025.6 RGI 7.0 initialisation and calibration!
We used the same input datasets (climate, topography, etc.) to generate OGGM glacier directories for RGI6, RGI7G, and RGI7C.
Since RGI7 currently has no mass-balance observations, we calibrated OGGM for all versions using the same regional mass-balance estimates from Hugonnet et al., 2021, assuming the regional average is constant for all glaciers in a region (as done in Zekollari et al., 2024) and do not change between RGI6 and RGI7. This is a strong assumption, but it has limited influence on the inversion itself (more so on projections).
We applied the OGGM inversion to RGI6, tuning glenA to match the regional ice-volume estimates from the [Farinotti_etal_2019] consensus.
The regionally tuned glenA parameters from RGI6 were then applied to RGI7G. As a result, any volume differences between RGI6 and RGI7 arise solely from updated glacier outlines, not data or methods changes.
Finally (less critical, but useful), we aggregated the RGI7G results to the glacier-complex level and re-ran the inversion on RGI7C, tuning it to match the RGI7G totals. This allows us to produce ice-thickness maps at the glacier complex scale without artefacts.
Directory structure and naming conventions for all levels#
Within cluster.klima.uni-bremen.de/~oggm/gdirs/oggm_v1.6, there are multiple options to choose from and we describe the folder structure in the following:
- Step 1:
L1_L2_files: here the directories with pre-processing level 1 and 2 can be found.
L3_L5_files: here the directories with pre-processing level 3 to 5 can be found.
Step 2: select a version of the directories (e.g. 2025.6 since OGGM v1.6.3) or 2023.3 (old)
Step 3: select the flowline type, centerlines or elevation band flowlines (elev_bands), optionally with the extension of your choice when using L1_L2_files.
Step 4: this is only needed when taking the L3_L5_files route. The folder name starts with the name of the baseline climate (e.g. W5E5) that has been used. For the 2023.3 glacier directories, additional folder name extensions exist.
Step 5 (only for the 2025.6 glacier directories within the L3_L5_files route): select the calibration option choice per_glacier, i.e. matching Hugonnet et al., 2021 for every glacier individually (approach used for the 2023.3 gdirs) or regional, i.e. calibrating every glacier to the regional mass-balance estimate and additional folder name extensions exist.
Step 6: select the Randolph Glacier Inventory (RGI) version. In OGGM v1.6.1, only RGI62 was available. In OGGM v1.6.3, for some directories also RGI70G or RGI70C available.
Step 7: select the border option (see Glacier map size: the prepro_border argument)
Explanation of the naming convention for the folder name extensions:
_spinup indicates that the dynamic spin-up has been used for the calibration, if left out the calibration was done without the dynamic spin-up.
_w_data indicates that additional data has been added to the directories: ITS-LIVE, Millan et al. ice velocity product and the consensus ice thickness estimate (all described in more detail later).
Deprecated: version 1.4 and 1.5 directories (before 2023)
v1.4 directories are still working with OGGM v1.6: however, you may have to change the run parameters back to their previous values. We document them here:
A. Default
If not provided with a specific prepro_base_url argument,
workflow.init_glacier_directories() will download the glacier
directories from the default urls. Here is a summary of the default configuration:
model parameters as of the
oggm/params.cfgfile at the published model versionflowline glaciers computed from the geometrical centerlines (including tributaries)
baseline climate from CRU (not available for Antarctica) using a global precipitation factor of 2.5 (path index: pcp2.5)
baseline climate quality checked and corrected if needed with
tasks.historical_climate_qc()withN=3. If the condition of at least 3 months of melt per year at the terminus and 3 months of accumulation at the glacier top is not reached, temperatures are shifted (path index: qc3).mass balance parameters calibrated with the standard OGGM procedure (path index: no_match). No calibration against geodetic MB (see options below for regional calibration).
ice volume inversion calibrated to match the ice volume from [Farinotti_etal_2019] at the RGI region level, i.e. glacier estimates might differ. If not specified otherwise, it’s also the precalibrated parameters that will be used for the dynamical run.
frontal ablation by calving (at inversion and for the dynamical runs) is switched off
To see the code that generated these directories (for example if you want to
make your own, visit cli.prepro_levels.run_prepro_levels()
or this file on github).
The urls used by OGGM per default are in the following ftp server:
https://cluster.klima.uni-bremen.de/~oggm/gdirs/oggm_v1.4/ :
L1-L2_files/centerlines for level 1 and level 2
L3-L5_files/CRU/centerlines/qc3/pcp2.5/no_match for level 3 to 5
If you are new to this, we recommend to explore these directories to familiarize yourself to their content. Of course, when provided with an url such as above, OGGM will know where to find the respective files automatically, but is is good to understand how they are structured. The summary folder (example) contains diagnostic files which can be useful as well.
B. Option: Geometrical centerlines or elevation band flowlines
The type of flowline to use (see Glacier flowlines) can be decided at level 2 already. Therefore, the two configurations available at level 2 from these urls:
L1-L2_files/centerlines for centerlines
L1-L2_files/elev_bands for elevation bands
The default pre-processing set-ups are also available with each of these flowline types. For example with CRU:
L3-L5_files/CRU/centerlines/qc3/pcp2.5/no_match for centerlines
L3-L5_files/CRU/elev_bands/qc3/pcp2.5/no_match for elevation bands
C. Option: Baseline climate data
For the two most important default configurations (CRU or ERA5 as baseline climate), we provide all levels for both the geometrical centerlines or the elevation band flowlines:
L3-L5_files/CRU/centerlines/qc3/pcp2.5/no_match for CRU + centerlines
L3-L5_files/CRU/elev_bands/qc3/pcp2.5/no_match for CRU + elevation bands
L3-L5_files/ERA5/centerlines/qc3/pcp1.6/no_match for ERA5 + centerlines
L3-L5_files/ERA5/elev_bands/qc3/pcp1.6/no_match for ERA5 + elevation bands
Note that the globally calibrated multiplicative precipitation factor (pcp) depends on the used baseline climate (e.g. pcp is 2.5 for CRU and 1.6 for ERA5). If you want to use another baseline climate, you have to calibrate the precipitation factor yourself. Please get in touch with us in that case!
D. Option: Mass balance calibration method
There are different mass balance calibration options available in the preprocessed directories:
no_match: This is the default calibration option. For calibration, the direct glaciological WGMS data is used and the Marzeion et al., 2012 tstar method is applied to interpolate to glaciers without measurements. With this method, the geodetic estimates are not matched.
match_geod: The default calibration with direct glaciological WGMS data is still applied on the glacier per glacier level, but on the regional level the epsilon (residual) is corrected to match the geodetic estimates from Hugonnet et al., 2021. For example:
L3-L5_files/CRU/elev_bands/qc3/pcp2.5/match_geod for CRU + elevation bands flowlines + matched on regional geodetic mass balances
L3-L5_files/ERA5/elev_bands/qc3/pcp1.6/match_geod for ERA5 + elevation bands flowlines + matched on regional geodetic mass balances
match_geod_pergla: Only the per-glacier geodetic estimates from Hugonnet et al., 2021 (mean mass balance change between 2000 and 2020) are used for calibration. The mass balance model parameter \(\mu ^{*}\) of each glacier is calibrated to match individually the geodetic estimates (using
oggm.core.climate.mustar_calibration_from_geodetic_mb()). For the preprocessed glacier directories, the allowed \(\mu ^{*}\) range is set to 20–600 (more in Monthly temperature index model calibrated on geodetic MB data). This option only works for elevation band flowlines at the moment. match_geod_pergla makes only sense without “external” climate quality check and correction (i.e. qc0) as this is already done internally. For example:L3-L5_files/CRU/elev_bands/qc0/pcp2.5/match_geod_pergla for CRU + elevation bands flowlines + matched geodetic mass balances on individual glacier level
L3-L5_files/ERA5/elev_bands/qc0/pcp1.6/match_geod_pergla for ERA5 + elevation bands flowlines + matched geodetic mass balances on individual glacier level
Warning
make sure that you use the oggm_v1.6 directory for match_geod_pergla and match_geod_pergla_massredis! In the gdirs/oggm_v1.4 folder from the OGGM server, the match_geod_pergla preprocessed directories have a minor bug in the calibration (see this GitHUB issue). This bug is removed in the latest OGGM version and the corrected preprocessed glacier directories are inside the gdirs/oggm_v1.6 folder.
E. Further set-ups
Here is a list of other available configurations at the time of writing (explore the server for more!):
L3-L5_files/CERA+ERA5/elev_bands/qc3/pcp1.6/no_match for CERA+ERA5 + elevation bands flowlines
L3-L5_files/CERA+ERA5/elev_bands/qc3/pcp1.6/match_geod for CERA+ERA5 + elevation bands flowlines + matched on regional geodetic mass balances
L3-L5_files/ERA5/elev_bands/qc3/pcp1.8/match_geod for ERA5 + elevation bands flowlines + matched on regional geodetic mass balances + precipitation factor 1.8
L3-L5_files/CRU/elev_bands/qc0/pcp2.5/match_geod for CRU + elevation bands flowlines + matched on regional geodetic mass balances + no climate quality check
L3-L5_files/CRU/elev_bands/qc0/pcp2.5/no_match for CRU + elevation bands flowlines + no climate quality check
L3-L5_files/CRU/elev_bands/qc0/pcp2.5/match_geod_pergla_massredis for CRU + elevation bands flowlines + matched on regional geodetic mass balances + mass redistribution instead of SIA (see: Mass redistribution curve model)
L3-L5_files/ERA5/elev_bands/qc0/pcp1.6/match_geod_pergla_massredis for ERA5 + elevation bands flowlines + matched on regional geodetic mass balances + mass redistribution instead of SIA
Note: the additional set-ups might not always have all map sizes available. Please
get in touch if you have interest in a specific set-up. Remember that per default, the climate quality check
and correction (oggm.tasks.historical_climate_qc()) is applied (qc3). However, if the pre-processed directory
has the path index “qc0”, it was not applied (except for match_geod_pergla where it is applied internally).
F. Error analysis and further volume and mass change comparison for different pre-processed glacier directories
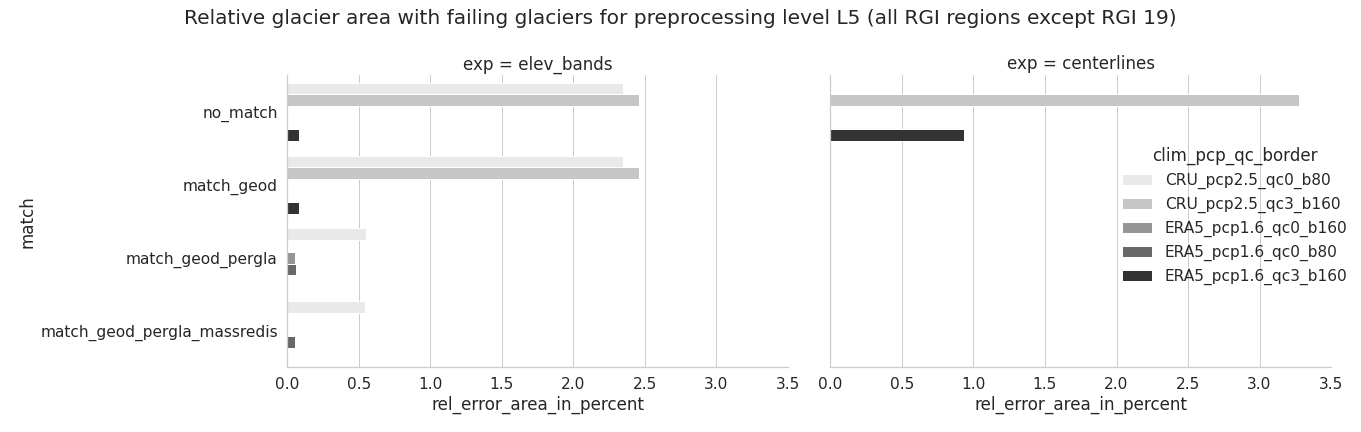
Overall, calibrating with ERA5 using a precipitation factor of 1.6 results in much less errors than CRU with pf=2.5. In addition, less errors occur for elevation bands and when using the match_geod_pergla option.#
A more detailed analysis about the type, amount and relative failing glacier area (in total and per RGI region) can be found in this error analysis jupyter notebook.
If you are also interested in how the “common” non-failing glaciers differ in terms of historical volume change, total mass change and specific mass balance between different pre-processed glacier directories, you can check out this jupyter notebook.